Latest Posts

Gochujang Tofu

Week 6 – 2021

This is another post from the series “I tried something new this week”.

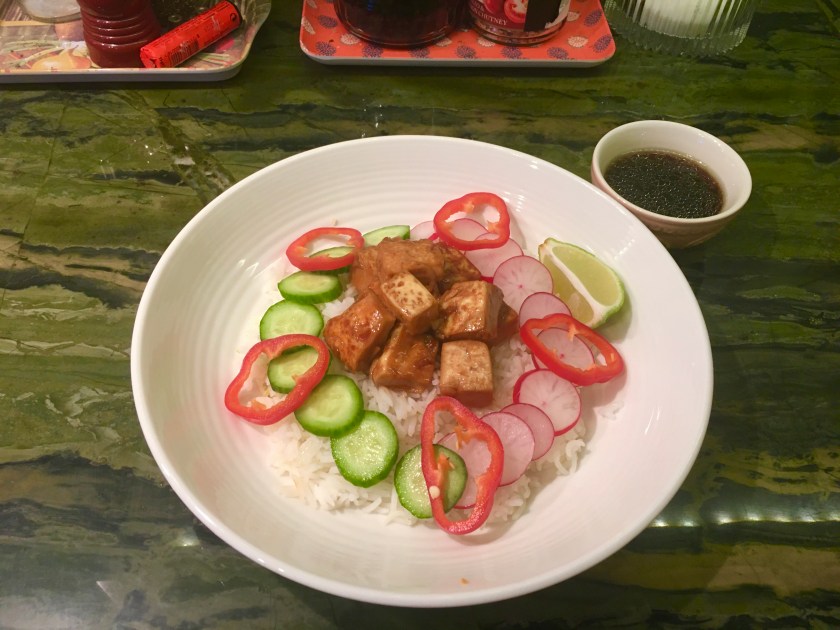
I have tried for a while now to cook tofu in different ways and this week I decided to use one of the sauces I bought recently – Gochujang. In case you haven’t cooked with it before, it’s a red chilly paste popular in Korean cooking. I like it because it has a good balance of savoury, sweet and spicy.

The recipe I tried this week is very simple but it makes a delicious meal.

Ingredients

  • 250g tofu
  • 200g rice
  • Gochujang paste
  • Kimchi
  • oil
  • soy sauce
  • mirin
  • ginger
  • garlic
  • salt
  • pepper
  • white sesame seeds

Method

Step 1

Preheat the oven at 200°C. Start boiling the 200 ml water for the rice. Wash the rice and add it to the pot. It depends a bit on the rice but if I use basmati I boil it for 10 minutes and then I leave it covered to rest for another 10 minutes.

Step 2

Cut the tofu in 2cm cubes and try and get it as dry as possible. I wrapped the cubbed tofu in kitchen roll and put it between two plates with a can on top, so that the tofu is squeezed a bit. Leave the tofu to dry for a bit, even 15 minutes helps a lot but if you dry it for 1 hour you get really good results.

Step 3

Toss the tofu in oil and soy sauce, dress with salt and pepper and put in the oven for 20 minutes, turning half way through.

Step 4

While the tofu is baking, prepare the sauce. Mix 150 ml water with 1 teaspoon of soy sauce, 1 teaspoon mirin, 1 teaspoon of grated ginger, 1 teaspoon of crushed garlic and 2 tablespoons of gochujang paste. Add the sauce to a pan, get the tofu out of the oven and mix through. Gently simmer for a few minutes until the mix gets a bit sticky.

Serve the tofu hot with the rice, some sesame seeds on top and Kimchi on the side.

Tips

Next time I will do this recipe I will also add something green and crunchy, like spring onion and finely chopped cucumber. It’s a great dish but it would be even better with a bit more texture and freshness.

Salmon with Shiitake & Peppers

Week 5 – 2021

This is another post from the series “I tried something new this week”.

If you like simple dinners than this recipe is definitely for you! It takes maximum 15 minutes to prepare.

Ingredients (2 portions)

  • 2 salmon fillets
  • 1 red pepper
  • 1 pack of shiitake peppers (100-150g)
  • 2 medium size potatoes
  • 3 tbs soy sauce
  • 3 tbs sesame oil
  • salt
  • pepper
  • olive oil

Method

Preheat the oven to 200°C . Cut the potatoes into wedges. Brush the potato wedges with olive oil and season them with salt and pepper. Put them in the oven and set the timer to 35 minutes.

In the mean time add the salmon fillets to an ovenproof dish. Cut the pepper into slices and add them to the dish, then add the shiitake mushrooms. Season with a bit of salt and pepper.

Mix the soy sauce and the sesame oil and add to the dish.

When the potatoes have been in the oven for 15 minutes, sink the temperature to 160°C and put the fish in the oven. Serve the fish with the vegetables, the potato wedges and the excess sauce from the ovenproof dish. Enjoy!

Green Smoothies

Week 4 – 2021

This is another post from the series “I tried something new this week”.

Lately I have been trying to minimise food waste as much as possible. In general, I try to minimise waste of any kind but throwing away food is something that I hardly tolerate. Yes, we have everything at our fingertips, from takeaway food to grocery deliveries. But it’s hard to find vegetables with a good shelf life.

During the lockdown I tried to organise my groceries by ordering deliveries for staples and go to the local market for fresh ingredients. This way I get to support the local market as well. And even when I organise the food well I still end up with a surplus of vegetables or fruits sometimes.

I found a really good way to prevent any fresh vegetables or fruits go to waste, I do smoothies. They make a great breakfast or afternoon snack and they keep well in the fridge for at least one day in a sealed jar.

I am going to share with you some of my ideas for smoothies. It’s all about trial and error and adjusting after your own taste. For example I like green smoothies, with a fresh, sometimes even a bit bitter taste.

Spinach Smoothie

This smoothie has a slightly bitter taste, but it’s very fresh and it keeps well in the fridge for about 2 days.

Ingredients

  • spinach
  • apple
  • mint
  • lemon juice
  • cucumber
  • banana
  • pineapple
  • milk/almond milk

Tips

I have a blender with 1 1/2 liters capacity and I made this smoothie with a lot of spinach, about 3 quarters of the blender cup. If you like a bit of bitterness in it, keep the stems as well.

I used green apples, again, because they are not so sweet. The apples and the cucumber have so much water in them that you don’t need a lot of milk, I added about 200 ml of it.

If you have any frozen banana you can add it as well, it blends perfectly with the rest of the ingredients.

Celery Smoothie

Celery is one of these vegetables that is sold for some reason in huge bunches. I love it in salads and as a snack but more often than not I have a few celery sticks left and starting to get soft.
I tried it in a smoothie and it went great! Here is what I used:

  • celery sticks
  • apple
  • frozen pineapple
  • frozen banana
  • cucumber
  • mint
  • milk

Tips

The celery can leave a few strings in the smoothie. They didn’t bother me but you might want to use a strainer. Be aware that blended celery has an overpowering taste. I added quite a few mint leaves to balance that. The frozen fruits add a nice, slightly sweet taste to it and I used very little milk for this, around 200 ml.

I am really enjoying how much fruits and vegetables I am able to incorporate in my diet with those smoothies, I am going to keep on experimenting with different combinations!

Snow Flakes & Memories

Week 3 – 2021

This is another post from the series “I tried something new this week”. But this week is a bit different, I am not writing about something new that I cooked, or tried, I am writing about something new that I experienced.

Every morning this winter I have been hoping for either blue skies or snow. Granted that snowing doesn’t happen very often in South West London, one can only hope right?

This morning I woke up to the same grey sky that makes every day look the same. The grey is in perfect sync with the monotony of the lockdown and yet it seems like is mocking you every day with it’s passivity. It’s this feeling that you get when you look up, that no sun, moon or stars ever existed. The clouds are not even clouds anymore, they are just a thick blanket that puts the landscape around you in a non flattering light.

I have my morning coffee thinking about ways to make today different and I almost miss the fact that it started snowing. Since I moved to Hampton Wick about 6 years ago it snowed a few times but the snow never managed to set. This time it looks like it’s snowing for real, big snow flakes sticking on cars, trees and covering pretty much everything. I get dressed as quickly as I can and run to Bushy Park. Not many people in the park yet and it’s snowing like it used to snow in Romania in the middle of winters. I grew up with snow about 3 months of the year, I miss it, I dream about it.

I stop in the middle of the park and look up just as I used to do more than 25 years ago. The time just stops. I am a child again. All the stories that I ever read about winter rush through my head. All my winter memories rush through my head. Me sitting by the window, patiently waiting for the first snow of the year to set, hoping that I will get to take the sledge out. The sound of my boots squeezing gently the first snow on my way to school, my mum tying my winter scarf over my mouth on winter mornings so that I am not cold walking to the other side of the village. Everything came rushing in my head. Memories were building on top of each other and forming like snow flakes into snow.

Today I experienced my first snow in Hampton Wick and it was light and it’s probably not going to last until tomorrow. And yet it stormed on me with a force that I haven’t anticipated. I tapped into memories that I didn’t even know that exist. All of a sudden I wasn’t in Bushy Park anymore, I wasn’t taking pictures of the Hampton Court palace gardens covered in snow, I was a child at the edge of a remote village in Transylvania, in the middle of a cold winter.

Sometimes we underestimate how much small things mean to us. How snowflakes can become heavy and meaningful. How memories are triggered by the simplest things around us. We need to create space in our lives, our worry, our everyday routine , for the simple things that bare so much meaning.

Mirin Marinated Tofu & Lime Rice

Week 2 – 2021

This is another post from the series “I tried something new this week”.

I like to do very simple recipes for lunch, mostly something fresh and light. The recipe I am writing about this week makes a really good lunch and it was also an opportunity for me to try a new way to cook tofu. This is the first time I used both silken tofu and mirin. Mirin is a sweet Japanese rice wine that makes a great marinade for tofu.

Here is what I tried and what I would improve for the next time.

Ingredients (2 portions)

  • 150 basmati rice
  • 1 lime
  • 250g silken tofu
  • 4 tbs mirin
  • 4 tbs soy sauce
  • 4 tbs honey
  • salt
  • pepper
  • cooking oil
  • a knob of butter
  • radishes
  • cucumbers
  • sweet red peppers

Method

Wash the rice and cook it with a pinch of salt and a knob of butter for 10 minutes. When cooked, let it stand for 10 minutes.

In the mean time cut the tofu in 2cm cubes and gently fry it for a few minutes in a splash of oil. Prepare the marinade with the mirin, honey, soy sauce and 1 tbs of oil. Marinate the fried tofu for about 5 minutes and then fry again for a few minutes. Season with a bit of salt and set aside. Save the marinade, take it through a sieve and keep as extra seasoning for the dish.

Marinated Tofu

Thinly slice the radishes, cucumbers and peppers. Zest the lime and stir it through the rice.

Plate the rice with the fresh vegetables and tofu, add salt and pepper and some marinade. Serve with a lime wedge.

Tips

  • The marinade is quite sweet so next time I will try with just half of the honey quantity and something spicy instead, chilly flakes or a bit of chilly powder.
  • The silky tofu is delicious but I think is amazing when you use it in soups. In a rice dish the consistency is slightly too soft, crispy cooked tofu would be better for this recipe.

Tuna Steak with Bulgur & Beetroot

Week 1 – 2021

This is another post from the series “I tried something new this week”.

I started this year with a lot of inspiration! I have been watching a lot of cooking shows lately and my partner and I have decided to buy more food that we never cooked with. Every time we go to the local market we get a vegetable that we never used before. We also started to get ingredients that we are not comfortable cooking with. So we really pushed ourselves lately and is fun!

This week we created this recipe and I thought of sharing it with you because it turned out great. We did tuna steaks with a bulgur salad and roasted beetroot and fennel.

Ingredients (2 portions)

  • 2 tuna steaks
  • coriander seeds
  • black peppercorns
  • sea salt
  • olive oil
  • 1 lemon
  • 100g bulgur
  • 1/2 red onion
  • a few plum tomatoes
  • mooli radish
  • 3 fresh beetroots
  • 1 fennel
  • parsley

Method

Step 1. Preheat the oven at 200°C, Peel the beetroot and cut it in wedges. Cut the fennel in wedges. Brush all wedges with olive oil and season with salt and pepper. Put in the oven for 30 minutes.

Step 2. Boil 400 ml water and add 100g of rinsed bulgur to it. Simmer for 15 minutes. While the bulgur is simmering dice finely the red onion, cut the plum tomatoes in half , cut about 10-15 slices of mooli and zest the lemon. After the bulgur is cooked let it stand for 10 minutes and then mix the lemon zest, the onion, tomatoes and mooli and season with salt and pepper. Garnish with parsley.

Step 3. Use a pestle and mortar or a blender to crush the coriander seeds with the black peppercorns and the sea salt. Coat the tuna steaks with olive oil and then with the spice mix. Fry the tuna without oil on medium high heat in a non-stick pan. For a 2cm tuna steak you need to fry about 1 and a half minutes on each side. It needs to remain pink on the inside. When the tuna is resting, add a bit of olive oil and lemon juice on it.

Serve the tuna steaks with the bulgur salad and the roasted beetroot and fennel. Garnish with a lot of parsley. Optionally do a parsley salsa verde with olive oil, garlic, salt and pepper to drizzle on top. Enjoy!

Sriracha & Honey Chicken Wings

Week 53 – 2020

This is another post from the series “I tried something new this week”.

It’s the last week of the year and my partner and I decided to try and do chicken wings at home. We like them but we didn’t know we can actually grill them at home the way we want to. We don’t have a barbecue so we decided to use the oven. They turned out really delicious so I am going to share with you how we’ve done them.

Ingredients

  • chicken wings
  • sriracha
  • honey
  • salt
  • pepper
  • American BBQ Spice mix
  • oil

Method

Preheat the oven at 180°C on the fan setting and prepare a wide tray with a grill on top of it. We used one of the grills that came with the oven. It’s a good idea to lay foil on the tray because the fat from the wings is going to drip.

Season the chicken wings with salt, pepper and the spice mix. We used the bbq spice mix but you can mix your favourite spices, depending on your own taste. Paprika, chilly powder and the peri-peri spice mix are also delicious options. Next, coat the wings with a bit of oil. Use a brush if you want to use less oil.

Lay the wings on the grill and put them in the oven for 20 min. These first 20 minutes are not going to give the wings a crisp but it’s good to start at this slightly lower temperature so that some fat will drip but you won’t end up with a lot of smoke in the house when you open the oven.

After 20 minutes take the chicken wings out, change the oven temperature setting on 200°C, and when it has reached that put the chicken wings back in the oven for another 20 minutes. Make sure you turn them half way through so that they get a nice crispy skin on both sides.

In the meantime prepare the glaze with equal parts of sriracha and honey.

Take the chicken wings out of the oven. At this point they have been in the oven for 40 minutes so they are cooked. Glaze them with the sriracha mix and put them in the oven for a few minutes on each side. The chicken wings are now done!

Tips

  • If you like the wings a bit more juicy just reduce the grilling time, you can always use a meat thermometer to make sure they are cooked. The timing also depends on how big the wings are.
  • For sides we chose grilled turnip and celeriac, fresh carrot and celery with a garlic sauce. We prefer to have fresh sides for these chicken wings because they are full or flavour so the freshness of the veggies offsets that a bit, is a good balance.

Crispy Rye Bread

Week 52 – 2020

This is another post from the series “I tried something new this week”.

Lately I have been watching some cooking shows and have been inspired to bake more. I like crispy bread because you can use it for canapés or for breakfast, it’s very simple to make and delicious.

I am going to share with you a super simple rye crispy bread recipe. I used a Swedish sifted rye flour but you can use any rye flour, you can even mix it with barley flour if you like to use that in baking.

Ingredients

  • 25g fresh yeast / 12g dry yeast
  • 1 teaspoon salt
  • 250ml lukewarm milk
  • 5dl rye flour

Method

Mix the yeast with the lukewarm milk in a bowl and when the mixture is smooth add the salt and the flour. Then use a hand mixer to make the dough.

After the dough is mixed divide it in 10 equal parts. Each part should be around the size of an egg. Leave the dough under a tea towel for 30 minutes.

While the dough is resting preheat the oven to 250°C. For the crispy bread you need a wide tray so make sure you preheat the tray as well.

After the dough has rested start by spreading each dough into a thin layer of about 1-2mm. If you have an embossed rolling pin you can use it after the dough is thin enough.

Place each dough spread on baking paper and transfer it to the preheated tray. Bake for 3-4 minutes.

Enjoy with a cheeseboard, as a canapé with a bit of cream, red onion and caviar or simply for breakfast with some butter.

Udon Noodle Miso Soup

Week 51 – 2020

This is another post from the series “I tried something new this week”.

My partner and I like to try a lot of new recipes and new techniques when it comes to food. Every now and then we pick something that we are not comfortable cooking and we try to do it. We always put our own twist to it and if turns out ok we iterate on it, we alter the recipe after our own taste and we just make it better after a few tries.

This week we made a soup with udon noodles and miso. When we saw this recipe we thought that some of the ingredients in this soup have never actually made their way into our cooking. A good reason for us to try.

It turned out really well so I am going to share our adapted recipe here. We made 2 generous portions of soup.

Ingredients

  • 2 spring onions
  • 250g shiitake mushrooms
  • 1 Pak Choi
  • 300g cooked udon noodles
  • 1 tablespoon grated ginger
  • 3 tablespoons miso paste
  • 3 chicken stock cubes
  • 1 tablespoon sesame oil
  • 1 red chilly
  • 2 eggs
  • 1.2 litres of water

Method

Take off the stems and clean the shiitake mushrooms with a damp kitchen roll. Peel and grate the ginger. Cut the spring onion into fine pieces. Take the leaves off the pak choi and wash them individually. Cut thin slices of chilly.

Start the broth by gently frying the mushrooms in the sesame oil with the spring onion and the ginger. They need 3-4 minutes. After that add the water, miso paste and the stock cube and simmer for about 10 minutes. Then add the pak choi leaves and the noodles and simmer for another few minutes until the pak choi leaves are slightly soft.

While the broth is simmering boil 2 eggs for 6 and a half minutes.

Serve the soup with the soft boiled eggs cut in half and a few slices of chilly.

Tips: instead of cooking the spring onion you can replace it with shallot and add some fresh spring onion on top, as garnish.

Stopping the Time with Short Stories

Week 50 – 2020

This is another post from the series “I tried something new this week”.

I have written a few blog posts about trying something new each week and they were mostly about food but last week was a bit different. I wanted to start focusing on something that I wanted to do for a long time – learning how to write short stories.

I am a big fan of short stories, I read anything that I can my hands on. From Chekhov to Neil Gaiman. I recently re-read some of the Grimm stories. I am particularly passionate about mythology and folklore stories. And I always wanted to learn how to write my own.

In all honesty, I am not sure I am good at it, I have started to write and develop quite a few ideas, from stories that I heard as a child from my grandmother to fantasy stories that I came up with during my travels. There is only one way to find out if I am any good at it – do classes that teach me techniques and push me to write frequently. Then write. Then write some more.

This is not the only class that I am taking at the moment. Almost every week I have yoga, golf and Swedish classes. I do invest a lot of time in learning and growing, is one of the things that motivates me and keeps me way above the water even in those times when isolation keeps most of us confined to a form of existence that we are simply not used to. The moments that I value a lot – spending time with family and friends – are simply not possible to realise in those times. So I invest a lot of time in developing and making the best out of a difficult year.

The writing class that I am doing is online, I have classes that I can do in my own time and writing exercises that I can revisit over and over to improve. Is difficult! I have so much to learn, but I am willing to dedicate the time to learn how to feed the process of creation with my own words.

The act of writing makes me tap into some inner energy that I didn’t even know I have, it’s stopping the time and it makes me remember things that were long forgotten. It makes me be very present! If you find something that makes you feel this way go for it! It doesn’t really matter if the work that you will produce is accepted or liked by others but if it creates something for you then it should be good enough. If your work, no matter what that is – cooking, writing, coding – has a good effect on others and it makes them happier or safer or better, then that is great news. But you need to start with yourself. Your own work should have a positive reflection on you. If you start from there you are in for a wonderful journey!