Latest Posts

Romanian Meatball Soup (Ciorba de Perisoare)

Week 49 – 2020

This is another post from the series “I tried something new this week”.

I grew up in Romania, in the region of Transylvania, in a small village with no restaurant or food delivery services. Buying ready meals was not popular at all in the area. And in all honesty, is not popular today either. Everyone cooks at home and I grew up on home-made food, which I crave now from time to time. With Christmas coming, and me not able to see all my family this year, I need to bring some childhood home smells and tastes into my own home.

Today I decided to make sour soup after one of my mum’s and aunt’s recipes. They have been sharing recipes for so many years and I grew up eating food cooked by both of them so it’ hard to separate. For me, all the Romanian recipes I have come from both. They are family recipes!

Sour soups are very popular in Romania so I will share more with you in my future posts, but meatball soup is one of my favourites.

Ingredients

Soup:

  • 2 medium sized carrots
  • 1 medium sized white onion
  • 1 small celeriac
  • 1 red pepper
  • 2 tbs oil
  • 2 tbs tomato paste
  • salt
  • pepper
  • 1/2 cube of vegetable stock
  • a few slices of cabbage | a few cauliflower florets

Meatballs:

  • 500g minced meat (turkey|pork|beef)
  • 2 eggs
  • 50g rice
  • 1 tbs oil
  • salt
  • pepper
  • 1/2 cube o vegetable stock
  • dry thyme
  • fresh parsley

Method:

Meatballs:

I like to start by doing the meatballs mixture first and then leaving it in the fridge until it’s needed. This way the ingredients fuse together and the meat is easier to handle.

Add meat to a bowl (I used minced turkey), then add salt, pepper, the vegetable stock and the eggs (I add 1 teaspoon of salt and 1 teaspoon of freshly ground pepper). Wash and add the rice. (I use basmati rice). Add a sprinkle of dry thyme, 1 tablespoon of oil and fresh finely chopped parsley. Dry parsley works as well if you don’t have fresh one. Mix everything together and put the mixture in the fridge.

Soup:

Before starting the soup make sure you have a pot that holds at least 4 litres of water. You will need about 2.5 litres of water but you also need to account for vegetables and meatballs.

For the soup you need to grate the carrots and the celeriac and dice the pepper. Add all of those to the pot with 2 tablespoons of oil. I like to start the soup from cold oil but many people prefer to heat the oil first. I personally believe that starting with cold oil the colour of the vegetables is better preserved and the taste is a bit more subtle.

Start cooking the vegetables and dice the onion in the meantime. After the vegetables have been cooked for a few minutes add the onion and 2.5 l of water. Then bring the soup to a simmer and add salt, pepper and the vegetable stock. (I start with 1 teaspoon of salt and 1 teaspoon of freshly ground pepper).

While the soup is simmering take the meat mixture out of the fridge and do about 30 meatballs. I like to shape them small so that they absorb some of the soup flavour.

Add the meatballs to the soup and simmer for 30 minutes. 10 minutes before the soup is done mix 2 tablespoons of tomato sauce in a small bowl with a few spoonfuls of the soup mixture until it loosens. Add it to the soup. Optionally add a bit of chopped cabbage or a few cauliflower florets.

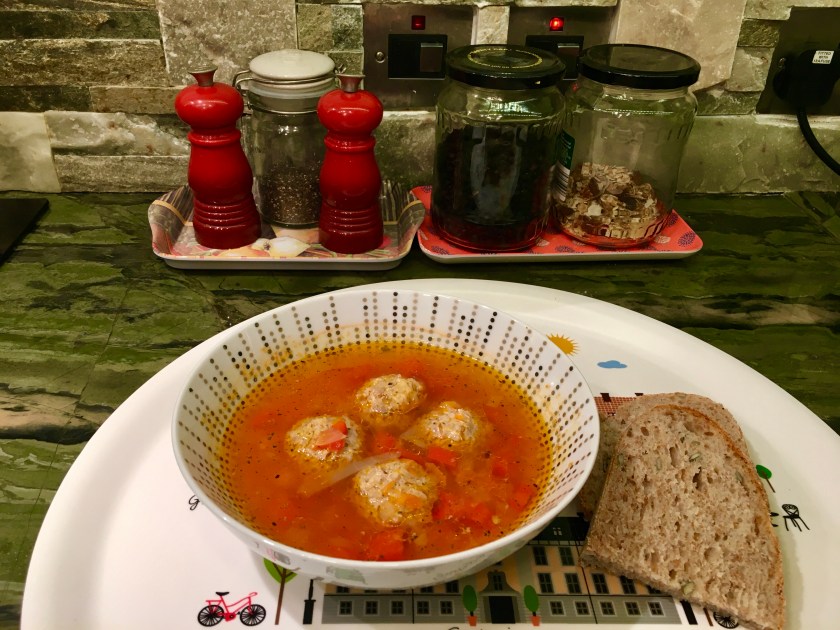
After it simmers let the soup stand for another 15-20 minutes and add any salt or pepper after your own taste. Serve warm with some bread. The soup tastes good after one reheating as well. Enjoy!

Swedish Saffron Buns (Lussebullar)

Week 48 – 2020

This is another post from the series “I tried something new this week”.

Sunday blues are even more real in lockdown, in late November. Friends and family are far away and the overcast skies make it seem like it’s always 4pm on a winter day. Now more than ever it’s time to bring warm light and winter smells into the flat!

In Sweden the Lussebullar are eaten throughout the Advent. The first Sunday of Advent is today, so we lit the first advent candle and started baking!

We found a recipe online and we adapted it a little bit to what we had in the home so I am going to share it here. The recipe will yield around 30 buns.

Ingredients

Dough:

  • 3 x 8g dry yeast sachets
  • 6dl milk
  • 2 sachets of saffron
  • 150g butter
  • 2 dl sugar
  • 1 egg
  • 1/2 teaspoons salt
  • 16 dl wheat flour

For spreading on top and garnishing:

  • 1 egg
  • sultanas

Method:

Add the yeast and saffron to a bowl, with the melted butter and the milk warmed to the body temperature (37°C). Mix together until the yeast is dissolved. Then add the sugarsalt, egg and almost all the flour. Save a little bit of flour for the baking. Mix the dough with a hand mixer and set aside for about 45 minutes.

After that, divide the dough in about 30 small balls, then roll each ball into strands using a bit of flour. The strands should be around 20cm long, enough to be able to roll each end until you make the buns into an S shape.

After letting them sitting for another 20-30 minutes in the tray, spread some beaten egg with a brush and add one sultana in the middle of each side roll. Then bake at 220°C in the middle shelf for 8 minutes.

Tips:

  • if the saffron is old and it has changed colour try and add a bit more, the older it gets the less strong it is
  • freeze all the buns that you are not planning to eat in the next couple of days, when defrosted in the microwave or oven they taste almost like the fresh ones
  • if you like the buns a bit smaller add around 20g of dry yeast instead of 24g. We used 3 sachets but you could spare a half of sachet, ours turned out a bit on the big side. The dough was so fluffy that they almost lost shape.
  • if you don’t have a brush for the egg, use kitchen towel, it works pretty well
  • if you like them a bit on the sweeter side you can add pearl sugar on top

I hope you enjoy this recipe. Saffron buns make every house smell like a home!

Find Inner Energy with Kundalini Yoga

Week 47 – 2020

This is another post from the series “I tried something new this week”. I want to share a few thoughts after my first couple of kundalini yoga sessions last week.

I have been looking to improve my energy levels and my strength since I am working from home full time and do not move as much as I should. Is not enough with daily walks and the occasional run. For a while I did pilates but that became repetitive and a chore. I am clearly looking for something else that I can enjoy and is sustainable for me.

Before I found the class I didn’t know much about kundalini yoga. Actually, I don’t know much about it today, I just had 2 sessions. But I am super keen to learn because it feels really good after each session! So far I was taught a few breathing techniques and a few postures. They can be challenging and I had to push myself to find more strength, I could feel my muscles at the end of each session. The breathing can vary from very rapid to very deep and slow, with control. There are a lot of health benefits that these techniques can bring according to my brief research but right now I am focusing on what feels good for me in the moment or on the day. And I can definitely say that I found energy that I didn’t know was there and I benefited from it the entire day.

My sessions start weekly at 06:45 am on a Monday and committing to that time already requires me to change my routine, which is good. When my alarm went off at 06:15 am for the first session, I was grumpy and unsure. And I am morning person! This time is not far from my usual waking up time. But after 1h and 15 minutes I felt refreshed and relaxed, I forgot all about grumpiness and I was ready to start my day. My teacher made me feel so welcomed and helped me ease into the classes, now I am looking forward to those early Monday mornings, they are such an important part of my week.

The first class we practiced the kriya for unknown cause of sickness, followed by a meditation for releasing childhood anger. Kryia is a sequence of postures, some more challenging than others. I like it that they all have a name, a purpose, a connection. The meditation we did for 7 minutes was difficult for me on a physical level because we held the arms stretched at the shoulder height but also I struggled with my thoughts running wildly and unravelling. In yoga you need to focus on the now, you need to channel your energy on the present. I have a feeling that that particular part is slightly more difficult to achieve than the physical challenge. But I am so up for it.

Starting any new form of exercise that involves technique, balance or coordination requires time and dedication. I tend to always lean towards things that require a long learning curve, I find it challenging and rewarding. That’s the reason why I got into golf a few years ago. I have to play so much more to become good at it. Is almost like I embarked on a journey with the golf and now I am doing it with yoga.

In those challenging times when everything around us seems to be hanging and uneasy, woking on improving myself is key. It makes me feel like I am not just waiting for the lockdown to be over or I am not just waiting to travel again or see my family and my friends again. I am doing something for my physical and mental health. Everything starts with health! If you have that, you can go off and create things, discover things and help others. With kundalini yoga I feel like I am finally focusing on what’s important.

Swedish Cinnamon Buns (Kanelbullar)

Week 46 – 2020

So I set a challenge for myself to start doing something new every single week. Something that I haven’t done before and poses a challenge for me. That’s the way I push myself out of my comfort zone and ultimately I learn. It can be literally anything: cooking, painting, doing a new form of exercise, writing an article I always wanted to write or starting a class I always wanted to start. It doesn’t have to be a huge and overwhelming task, it can be something silly but enjoyable!

On week 46 I baked cinnamon buns after a Swedish recipe! I had home-made cinnamon buns in Sweden and this time I wanted to do my own and learn from my mistakes! And the fact is, that besides some minor hiccups, it all went well! They turned out delicious and my Sunday afternoon was brighter and fun!

This is the kanelbullar recipe I followed:

Ingredients:

Dough:

  • 8g of dry yeast (you can also use 25g of fresh yeast)
  • 50g butter
  • 3 dl milk
  • 1/2 dl sugar
  • 1/2 teaspoon salt
  • 8 dl wheat flour

Filling:

  • 50g butter
  • 2 teaspoons ground cinnamon
  • 1/2 dl sugar

Additionally for spreading and sprinkling on top:

  • 1 egg
  • pearl sugar

Method:

Dough:

Add the yeast to a bowl, with the melted butter and the milk warmed to the body temperature (37°C). Mix together until the yeast is dissolved. Then add the sugar, salt and almost all flour, save a little bit for the baking. Mix the dough with a hand mixer and set aside for about 30 minutes.

Filling:

Mix the melted butter with the cinnamon and sugar.

Making the buns:

Add some flour to your kitchen top or whatever space you have for processing the dough and use a rolling pin to spread the dough to approximately 30x40cm . Then spread the filling on top, take one side of the dough from the length and fold in two.

After the dough is folded, cut it into 20 strips. Start by cutting from the middle of the length, then cut each half into 10 strips.

Dough folded from the long side and cut in 20 strips.

The last step is to take a strip, leave about 2 cm from the top (assuming the top is where you folded) and do a cut in the middle of it. You will end up with 2 parts that are connected at one end, which you can twist around each other. After that take the twist and roll it into a bun.

Strips cut in half, twisted and then rolled into a bun.

Leave the buns on the tray for about 20 minutes, then spread some egg with a baking brush and add some pearl sugar. Then bake them at 250°C for 8 minutes. Done!

I did not have pearl sugar this time and you could clearly taste how much of a difference that makes, they are so much sweeter with the pearl sugar on top. Also, a trick I learned in Sweden, if you have cupcake paper you can bake them in that, they will look nice and also make them nicer for serving. I froze half of them, they are very nice after you defrost them as well, otherwise they keep in a dry place for a few good days.

I hope you enjoy this recipe!

Chanterelles on toast

Here is a very simple recipe that you can adjust after your own taste: Toss a bunch of chanterelles in butter with:

  • Finely chopped onion
  • Soy sauce
  • White pepper
  • Cream

Fry the chanterelles until they start crackling and then add them to toast with some fresh parsley on top.

A variation to this is to add finely grated parmesan cheese on top, add the toast in the oven for a few minutes and then top it up with parsley.

Enjoy!

“Constant Gardener” – A way to find Balance

First thing is first, I am going to start with the disclaimer: this is not a post about gardening.

I like being outdoors, I feel in my own element but gardening is taking skills which unfortunately I don’t have at the moment! Because, in all honesty, I am investing my time in other projects,

So now that this is out of the way you are probably wondering why I chose this title for the blog post. Well, first time when I said to someone that I am like a “Constant Gardener” it was in an interview. It felt like a good way to describe myself on the job. I work as a software engineer and live systems are like gardens, they grow in time, they need constant attention and fixing. If you are not careful the weeds of bad and unmaintainable code are taking over.

With all the rush of the world and the abundance of information everywhere I feel like being a constant gardener, always trimming and choosing, always prioritising, has become more and more important. I started to filter all the information that jumps at me from all screens at once because it has become unmanageable. I just cannot find the quality anymore, is lost in huge quantities of information. There is no such thing anymore as enjoying a message from a friend. The phones are full of messages all the time. Finding something good to watch is incredibly hard, immense amount of gardening and cutting weeds is needed right there.

I am minimalistic by nature, I have always been. But what I have been realising lately is that my minimalistic lifestyle doesn’t really extend only to possessions, I am becoming more and more restrained when it comes to social media, online resources and the amount of information I want. I don’t want to spend a lot of time in constantly trimming through news and content and other people’s endless need to express opinions. I love to read and I love to listen, but I am constantly needing to plough through too much content. I want more offline quality time so I came up with a few strategies that helped me a lot and I thought I would share them with you.

1. Choose your top interest and build a list of top sources for each of them

I know that I don’t have time to research every interest I have so I picked about 3 things that I constantly want to read about. I read about tech, writing and travelling. I have a short list of magazines and blogs that I follow, articles that have always provided value for me. I built my own list of trusted sources. If I have some downtime I go to my reading list instead of spending endless hours scrolling through pages.

2. On social media pick your network based on interests

I only use LinkedIn really and I only follow people that post articles I am interested in. I also use it to keep in touch with former colleagues and find interesting jobs. I don’t want to spend my time looking at what everyone else is doing and what they are posting, I probably can find the time but I can definitely not find the energy for it. To keep in touch with all my close friends I really don’t use social media, I prefer to meet them face to face, or in those times, sometimes we have video calls.

3. Focus on producing content not only absorbing content

When there is so much content you can choose from it’s easy to spend a lot of time focused on it but the truth is that everything slows down when you are trying to create some yourself. For example when I am writing everything stops around me, I have time to really process things and internalise. Creativity involves reflection. I found that many times I just read things but don’t allow myself the time to process. Whatever you like to do, whether is writing, painting, designing, you give yourself the thinking time that we all need. Many times creating one thing in a totally different field than my job helps me find solutions at work. Because I slow down so much so that everything becomes clearer.

This is how I manage to keep a good balance and spend much more time offline rather than online. I am constantly trying to find a pace for my life that I am happy with. I will keep on gardening!

Homemade Basil Pesto

If you like pesto why not try to do your own at home, since it takes around 15 min and it goes great with pizza, pasta and salads.

Here is a classic recipe with basil, pine nuts, Parmesan and garlic. This recipe will yield 4 portions of pesto.

Ingredients

  • 2 bunches / 2 cups of basil leaves
  • 1/2 dl pine nuts
  • 1 1/2 dl olive oil
  • 1 grated garlic clove
  • 1 dl grated parmesan cheese
  • 1 teaspoon salt
  • 1/2 teaspoon pepper

Directions

Put all the ingredients together in a blender and mix them! That’s it!

I have seen recipes where you mix all the ingredients with the exception of oil first but I mixed everything at once and it went all. The pesto has a great consistency.

Tips

I got this tip from a family friend so I thought I would share it here. In order to keep pesto for longer you can freeze it, and you can use ice cubes containers so that you can easily defrost small quantities when you need it. I thought that’s a great idea! No waste!

Another tip would be to use sunflower seeds or walnuts if you don’t have pine nuts. I tried with a mix of those two and it tastes great.

Two bunches of basil were used for this delicious jar.

Lingonberry Jam

There are a few types of lingonberry jam: light jam, dark jam, jelly – made only of juices and raw jam.

This recipe is for the light jam which takes only 15 minutes to cook.

Ingredients

  • 2 kg lingonberries (aprox. 3 litres)
  • 3-4 dl water
  • 1/2 kg sugar

Directions

Clean and wash the berries. Put them into a pot with water. Heat them up slowly and let them simmer for 15 minutes. Remove the pot from the heat and then add the sugar. Stir slowly from time to time until the sugar blends into the jam. Skim the foam and pour the pot content into pre-warmed jars.

Enjoy!

Pickled Cucumbers and Green Tomatoes

For preserving a 1 litre jar of cucumbers or green tomatoes you need about 1/2 litre of salt water, so I am going to write the ingredients that you need for that. The quantity of cucumbers or tomatoes really depends on the size. You don’t actually need that much and is very simple to do. It takes about 3 weeks for the pickles to be done, but if you put them somewhere in the sun it takes even less, about 2 weeks.

Ingredients

  • cucumbers/green tomatoes (to fit in a 1 litre jar)
  • 1/2 litre water
  • 30g salt
  • 1 teaspoon black peppercorns
  • 1 teaspoon white wine vinegar
  • 1 bayleaf
  • 1 garlic clove
  • 1 teaspoon dry thyme
  • 1 teaspoon mustard seeds
  • 1/2 teaspoon sugar
  • a few slices of horseradish root

Directions

Boil the water with the salt and the bayleaf and let it cool down.

In the meantime, put the cucumbers or the tomatoes in the jar and add all the other ingredients. One important thing to do here, if you pickle tomatoes, pierce them a few times.

When the water is not hot anymore, add it to the jar.

That’s it!

Tips

The cucumbers pickle better if they are whole, they don’t absorb that much salt. There are many types of pickling cucumbers out there, I tried a few times with Straight Eight cucumbers of medium size, and it went really well.

Green tomatoes can be quite small, you can even use cheery type tomatoes. The only requirement really is that they are not close to been ripe, and quite hard. This way they won’t get soft when pickled.

Pickled Cucumbers – Week 3